LIVE STREAM HATHA FLOW LIBRARY
September 2022 – Hatha Yoga Flow with Intro to Yoga Discipline Sampler Series
September 2020 – Yoga for Anxiety
September 2020 – Yoga for Freedom with Golden Sun Chakra Meditation
September 2020 – The Lateral Lines with Pranayama for COVID
August 2020 – The Solar Plexus
HATHA YOGA POSTURES TO PRACTICE LIBRARY
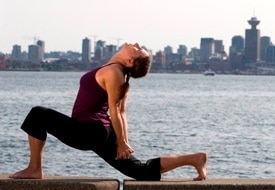
ANJANEYASANA / LOW LUNGE
Benefits
– Stretches the psoas and quadriceps muscles
– Opens the pectoralis major and the muscles around the neck
– Improves balance, focus and coordination
Restrictions
– Please do not do the deep lunge if you have a torn hip flexor
– Also do not release the head back if you have neck problems
Moving into the Low Lunge
1. Start on all fours in cat position and step your left foot forward, close to the left hand. Keeping the feet pelvis width apart, checking that your left knee is directly over the heel.
2. Tuck the toes of the right foot under (or leave them relaxed if that stresses your knee).
3. Engage your abdominal muscles, then inhale and lift your chest. As you exhale, carefully interlace the fingers behind your lower back so the heels of the hands are facing one another. If you are very flexible, press the palms together.
4. To support your lower back, try to slightly draw the tailbone down and then slowly release the head all the way back if you do not have any neck problems.
5. Take about 5 mindful breaths in this position, rolling the shoulders back and keeping the hips forward. When finished, slowly lead the heart forward to lift the head up and then move back into the cat or dog.
6. Do the same pose on the right side to stay balanced in your body.
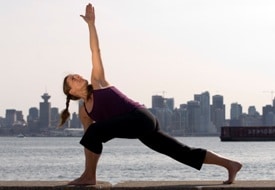
PARIVRTTA PARSVAKONASANA EIGHT PREP / LUNGE WITH A TWIST
Benefits
– Stretches the psoas and quadriceps muscles on the extended leg and strengthens the quadriceps on the supporting leg
– Opens the pectoral muscles and vertebral column
– Improves balance, focus, coordination and digestion
Restrictions
– Please do not keep the head looking up if you have neck problems
Moving into the Lunge with a Twist
1. Start with the same foot positioning as with the regular Lunge (above).
2. Place the right hand flat to the ground on the inside of the left foot, or a little ahead if you have a long torso.
3. Inhale, lift your chest, then exhale and roll your left shoulder back to lift that hand up with fingers pointing skyward. If it feels OK, turn and look up keeping your head one line with your spine.
4. Keep your tummy tight and encourage the twist by moving your right shoulder towards your left knee. If you want a better twist and more challenge for the legs, tuck the back toes under and lift the knee well off the ground.
5. Take about 5 deep breaths in this position, relaxing the shoulders away from your ears and lengthening the back leg. When finished, slowly look down and place the left hand flat in preparation for the cat or dog.
6. Do the same pose on the other side to stay balanced in your body.
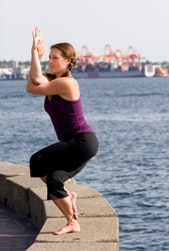
GARUDASANA / EAGLE
Benefits
– Strengthens the legs and opens the hips and shoulders
– Improves balance, focus and coordination
Restrictions
– Stand close to the wall and start with the legs if you need help balancing
Moving into the Eagle
1. Standing in the mountain pose, inhale and lift both arms up beside you like wings. As you exhale, bend the knees a lot and make sure you are weighted into your heels. (Hint: check that you can see your toes).
2. Keep breathing and transfer your weight to your right foot. Using your arms for balance, slowly lift the left leg up to cross over the right. See if you can tuck your toes in behind the calf muscle, but if you can’t just let the foot dangle.
3. As you breath, keep your belly pulled into your spine and cross your right arm elbow over the left to intertwine your arms. Interlace the fingers or place them in prayer and lift your elbows up, while relaxing the shoulders done.
4. Do your best to draw the shoulders back over the hips and hold for 3 to 5 breaths. (Hint: it is much easier to balance if you keep your gaze lightly fixed to one point straight ahead)
5. When you are ready to come out, release the legs and arms up beside you with and then exhale back to standing in mountain pose.
6. Once you feel centered, do the same positions on the other side.
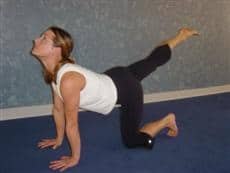
DANCING CAT

Benefits
– Improves digestion
– Tones the abdominals and buttocks
– Increases range of motion of the vertebrae
Restrictions
– Do not practice this posture if you have major wrist problems or if you are pregnant.
– Use foam blocks under the palms for support if you have painful arthritis, etc.
Moving into the Dancing Cat
1. Start on all fours in the cat, with palms under the shoulders and knees under the hips.
2. Tuck your toes under if it feels comfortable for you.
3. Exhale as you tuck your pelvis under and round your spine to touch your right knee towards your forehead. (Try to point your the toes of your R foot and keep the foot off the floor).
4. As you inhale, look up and extend the R leg back, lifting the leg as high as comfortable. (Point the toes away from you).
5. On the next exhale, round the spine again, drawing the head towards your R knee.
6. Try to move in a fluid and continuous motion.
7. Keep your arms straight and push your palms firmly into the floor as you move through the transition.
8. Continue with these movements, working with the breath for about 5 times with each leg.
9. If you are a beginner, you may want to rest in the child’s pose before moving onto the left leg.
10. Remember to rest and relax after both legs, in the child’s pose.
DHANURASANA / BOW
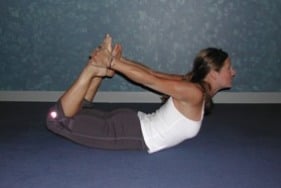
Benefits
– Strengthens the lower back
– Very good for stretching the quadriceps of the thighs, pectoral muscles of the chest, deltoids of the shoulders and opening the entire front body.
– Massages the abdomen and improves digestion
Restrictions
– This is an advanced posture and should only be done after appropriate warm up.
– Please do not try this posture if you have lower back problems or if you are pregnant.
Moving into the Bow
1. From resting on your tummy, reach behind you and hold on to the outside of both feet or ankles if you are more flexible.
2. Press your pelvis into the ground and contract your abdominal muscles to support your lower back.
3. Inhale, and as you exhale slowly lift your, chest, head and knees up off the ground. Breathe.
4. As you breathe, press your feet firmly into the palms.
5. Caution your neck by lengthening it and reaching up from the crown of your head.
6. Work the shoulders open and after 3 to 5 breaths release to the ground.
7. Contract your core muscles and push back to rest in the child’s pose or rabbit pose.
UTTHITA TRIKONASANA / TWISTED TRIANGLE
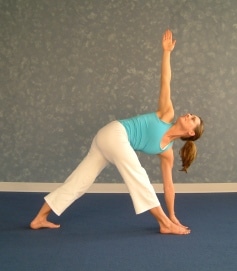
Benefits
– Very deep and cleansing twist for the spine
– Stretches open the hips, hamstrings and pectoral muscles in the chest
Restrictions
– This is an advanced posture, please do not try this posture if you have lower back problems or if you are pregnant.
– If you have neck problems, please look down towards the foot that is in front.
Moving from Triangle Pose to the Twisted Triangle
1. Start with your feet about one leg length apart. Turn your R foot 90 degrees away from you, and your L foot about 45 degrees towards the R.
2. Inhale as you open both arms out to the side at shoulder level, as you exhale move from the waist to turn to look in the direction your R toes are pointing.
3. Inhale again to lift your collar bone up, and as you exhale move to firmly place the L palm flat to floor on the inside of your R foot. (If you are tight through the hips and hamstrings you may only be able to reach your shin. Place the L palm lightly and avoid putting pressure to the knee joint).
4. If you can, look up towards your R palm as it lifts towards the sky. Breath deeply as you open your chest by rolling back through the R shoulder. You can look down to your R foot if the neck feels uncomfortable.
5. Let your breath tell you how you are doing in the pose. If the breath is short and choppy you must listen by easing up on the posture. To get the best twist think of extending the spine in two opposing directions.
6. Hold it in this position and breath into your areas of tightness for 3 to 5 breaths.
7. When you are ready to come out, inhale and lift the chest back up to starting position and repeat on the other side.
USTRASANA / CAMEL
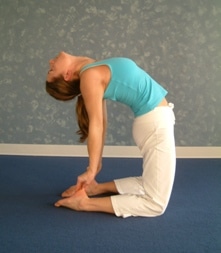
Benefits
– Stretches the quadriceps in the thighs
– Opens the pectoral muscles in the chest and also releases the throat
– Lung capacity is increased
Restrictions
– This is an advanced posture.
– Please do not try this posture if you have neck problems, lower back problems or if you are pregnant.
Moving into the Camel
1. Start sitting on your heels, with the knees slightly open and your palms flat on the ground behind you.
2. Keeping the chin to the chest, inhale and as you exhale squeeze your buttocks to lift your pelvis, bringing the hips up over the knees. (If there is minimal movement due to tightness in the quadriceps, then stay here and breath).
3. Breathe and work at pressing the pelvis forward, walk the palms carefully towards the heels and try to place the hands firmly into the heels for extra lift.
4. Open your chest by rolling back through the shoulders, then let the head rest all the way back if it feels OK for you. DO NOT hold the head part way up, as it is stressful for the neck.
5. Hold it in this position and breath into your areas of tightness for about 5 breaths.
6. To carefully come out of the posture, find your palms to the ground behind you again, walk them away from you and let the buttocks rest to the heels.
7. Slowly roll towards the child’s pose, by leading the chest/heart forward and leading the head follow. Rest here as long as needed to let the energy subside.
CORE STRENGTHENING POSES
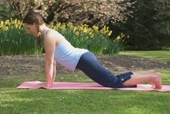
CHATURANGA DANDASANA / PLANK OR MODIFIED PLANK
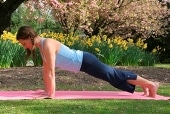
Benefits
– Strengthens many of the core muscles (rectus abdominis, transverse abdominis and lower back extensors)
– Strengthens the arms and chest
Restrictions
– Please do not do the High Plank if you are pregnant.
Moving into the Plank
1. Start on all fours in cat position with your hands right below the shoulders and your knees pelvis width apart.
2. Extend your right leg straight back, tucking the toes under. Do the same on the left and then press both heels back and away from you. Create maximal length in your body, by also extending the crown forward.
3. Keep your chin tucked back to align the neck with the rest of the spine.
4. Pull your belly button in close towards your spine and slightly tuck the pelvis under, staying supported with the lower abdominal muscles.
5. If your alignment doesn’t feel good and this is too challenging, slowly lower the knees to the earth for the easier modification. Feel strong in the pose and maintain the form, holding it for 5 to 10 breaths.
6. Upon completion, relax in the child’s pose with the hips back to the heels and the forehead resting to the ground. Arms weigh heavily along side the body with palms to the feet. Rest and breathe.
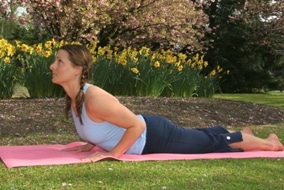
BHUJANGASANA / COBRA
Benefits
– Strengthens the lower back and upper back
– Opens the chest and abdominal region
– Massages the abdomen and improves digestion
Restrictions
– Please do not try this posture if you have major lower back problems or you are pregnant.
Moving into the Cobra
1. Start on your tummy with your palms close to the chest, finger tips in line with the top of your shoulders. Roll the shoulders back and down from the ears and extend your chin forward with a long neck. Be cautious not to strain the neck. Touch the big toes together, then relax your heels and legs.
2. Contract your abdominal muscles and inhale pressing your palms into the ground. As you exhale use your lower back muscles to lift your chest and head up. Inhale at the top of the movement, then exhale and slowly come down keeping your spine long. Repeat this exercise 3 times, coming up a little higher each time. Make sure your back is doing most of the work, the arms are only helping about 20%.
2. Finally, on your fourth cobra, lift up and hold there to breathe about five cycles of breath. Look up and do your best to keep the posture without struggling. Find your ‘edge’ in the pose where you are not over-working or under-working. When you are ready to come out, slowly release down.
5. Contract your abdominals, lift the hips and shift back to the child’s pose or the rabbit for a lower back stretch.
SALABHASANA PREP / LOCUST PREP – SUPERMAN

Benefits
– Great warm up pose for deeper core work
– Strengthens the lower back, upper back and buttocks
– Massages the abdomen and improves digestion
Restrictions
– Please do not try this posture if you have major lower back problems or you are pregnant.
Moving into the Locust Prep or Superman
1. Start on your tummy with your arms along side your body, palms flat to the ground beside your hips. Your feet can rest with the big toes touching and ankles falling away from one another.
2. Extend your chin forward with a long neck, without stressing your neck. Contract your abdominal muscles, inhale and on an exhale press your palms into the ground, lifting your chest and head up. Inhale at the top of the movement, then exhale and slowly come down. Repeat this exercise 3 times.
3. Next, extend your arms out from the the body like an airplane, with palms facing down. Again, your chin starts positioned to the ground. Contract your abdominals, inhale and as you exhale lift your arms, chest, head and legs up. Inhale at the top of the movement, then exhale to slowly release down. Repeat this exercise 3 times.
4. Finally, reach your arms up overhead with your palms shoulder width apart, still facing down. Retract the shoulders back from the ears. Connect the hip bones to the ground and contract your tummy. Inhale and as you exhale, lift your arms, chest, head and legs off the ground. Continue to breathe here and work at keeping the feet close together. Hold for about 5 breaths, then gently release to the ground.
5. Contract your abdominals, lift the hips and shift back to the child’s pose for a lower back stretch. It may feel nice to shuffle the hips from side to side in this position.
SHAVASANA / RELAXATION

1. Lie on your back with your feet and hands about 45 degrees from your body OR sit tall and soften your gaze. Closing your eyes is optimal if that is available to you.
2. Turn your attention to your breath, being with the breath as it enters your body, fills your body, and then leaves your body…
3. See if you can let go of everything else, bringing all your attention and awareness to your breathing. Feel the body expand with the inhalation and relax with the exhalation. Breathe all the air out before you take your next breath in…
4. Keeping your attention on your breathing, see if you can expand your awareness to include your whole body. Feel your back body, with each breath allowing you to let go and sink back deeper into whatever is supporting you. Feel your heart beat, and notice your pulse in various parts of your body. Check in with your digestion. Notice if there are any areas of tightness or tension in your body…
5. If you find tightness or tension, breathe your next inhalation into that part of your being, and as you exhale, let the tightness or tension leave your body with the breath.
6. Continue to breathe evenly, with ease. Allow a peaceful feeling of contentment wash over your entire being…
It is a good idea to consult with your doctor prior to starting an exercise program.
The information contained in this website is for general information purposes only. The information is provided by Body Harmony Yoga and while we endeavor to keep the information up to date and correct, we make no representations or warranties of any kind, express or implied, about the completeness, accuracy, reliability, suitability or availability with respect to the website or the information, products, services, or related graphics contained on the website for any purpose. Any reliance you place on such information is therefore strictly at your own risk.
In no event will we be liable for any loss or damage including without limitation, indirect or consequential loss or damage, or any loss or damage whatsoever arising from loss of data or profits arising out of, or in connection with, the use of this website.